Calculating the Axial Positions Trip Set Points from a Pump Axial Positions Datasheet

A typical axial position datasheet for a canned pump would look like the table below:

No. Item Value Unit
1 Measuring Range 4-20 mA
2 Axial Clearance 1.70 mm
3 Calibration 1 mm that corresponds to 2 mA
4 End Position Pump Side 10.30 mA
5 End Position Motor Side 13.70 mA
6 Alarm Pump Side (Note 1) 9.30 mA
7 Alarm Motor side (Note 2) 14.70 mA
8 Trip Pump side (Note 3) 8.30 mA
9 Trip Motor side (Note 4) 15.70 mA
10 Balance Position (Note 5) 10.52 mA
Notes:
1. Corresponds to 0.5 mm wear
2. Corresponds to 0.5 mm wear
3. Corresponds to 1.0 mm wear
4. Corresponds to 1.0 mm wear
5. Q = 201.5 m3/h SV = 0.11 mm

In order to obtain the minimum and maximum axial displacement alarm or trip set points:

  1. Note that there are 2 types of positions or sides given – motor and pump. Therefore, the measuring range of 4 – 20 mA would represent two sides (a positive value for the pump side and a negative value for the motor side). Calculating the amp allocated for each side: (20-4)/2 = 8.
  2. Since the measuring range starts at 4: 8 + 4 = 12.
  3. In row number 3, the table specifies that 2 mA equals to 1 mm. With this information, we can convert the values in rows number 6 to 9 to the required minimum and maximum set points by subtracting 12 from the given mA values and then dividing by 2 mA (per 1 mm):
    • minimum axial displacement alarm set point
      • (9.3-12)/2 = -1.35 mm
    • maximum axial displacement alarm set point
      • (14.7-12)/2 = 1.35 mm
    • minimum axial displacement trip set point
      • (8.3-12)/2 = -1.85 mm
    • maximum axial displacement trip set point
      • (15.7-12)/2 = 1.85 mm
  4. Note: They are written as minimum and maximum in the alarm set point list deliverable, but in actuality, the negative and positive values represent movement directions – pump side vs. motor side axial movement.
  5. With all four set points obtained, the wear amount could be confirmed using the “Notes” provided at the bottom of the table. Let’s pick the minimum axial displacement alarm set point. In line number 2, axial clearance for this pump is 1.7 which represents both the pump and motor sides: 1.7 / 2 = + 0.85 mm for the motor side and – 0.85 mm for the pump side. To get the wear amount, simply subtract their corresponding clearances form the set points. For the minimum axial displacement alarm, the calculation would be : – 1.35 – (-0.85) = -0.5. This value agrees with the provided “Notes”. When minimum axial displacement alarm is triggered, it suggests that 0.5 mm of wear may have occurred on the pump side. This would be useful in estimating the wear amount at any indicated values on the DCS.

Converting Temperature to ppm and vice versa for Dew Point Measurement.

Commissioning a cryogenic system in a plant that handles ethylene or propylene requires a process known as ‘system drying.’ System drying is an activity conducted before introducing cryogenic fluids to the system. This step is typically performed immediately after a tightness test. Its purpose is to eliminate moisture, thereby preventing the formation of hydrates or ‘ice’ within the unit when it is put into operation.

Typically, this activity is carried out either by repeatedly pressurizing and depressurizing the system with nitrogen or through continuous purging until the desired dew point is achieved (usually below -50°C).

There are two common methods used to measure the dew point: (1) using meters that measure the dew point in terms of temperature, and (2) through tube sampling, which indicates the concentration of water vapor in the system in parts per million by volume (ppmv). Project specifications or operating procedures typically specify the required dew point temperature in degrees Celsius. This often leads to confusion when a measurement method that provides readings in ppmv is employed.

The methods for converting between dew point temperature and ppm (parts per million) are not widely available or taught, causing engineers to rely on charts with a limited pressure range.

Converting dew point temperature to ppmv and vice versa can be achieved using the Magnus equation. This equation can accurately estimate vapor pressure over water or ice with a high degree of accuracy, and it is not difficult to apply. I will demonstrate how just two instances of the Magnus equation are all that is needed to convert between dew point temperature and ppmv.

For the temperature range of -45°C to +60°C, the Magnus equation provided below can estimate the vapor pressure over water at a 95% confidence level. In this equation, ew(t) is the saturation vapor pressure in pascals, and ‘t’ is temperature in degrees Celsius.

$$\ln ew(t) ={\ln 611.2}+{17.62t \over 243.12 + t} $$

For the temperature range -65 °C to +0.01 °C, the Magnus equation provided below can estimate vapor pressure over ice at the 95% confidence level. In this equation, ei(t) is saturation vapor pressure in pascals & t is temperature in degC.

$$\ln ei(t) ={\ln 611.2}+{22.46t \over 272.62 + t} $$

When the dew point temperature is obtained by the dew point meters, water vapor pressure could be estimated using the Magnus equations shown above, as demonstrated below.

Since PPM by volume is a ratio of partial pressure to total pressure in a million, the known vapor pressure (partial pressure) from the above calculation can be used in the equation below. In this formula, the total pressure refers to the line pressure during the measurement. The calculator below is linked to the result from the water vapor pressure calculator mentioned above.

$$PPM(v) ={Partial\ Pressure \over Total\ Pressure} \times1000000$$

The consistency of the results from calculations above are consistent with Linde’s Dew Point Chart web page. By using calculation instead of chart, the dew point could be estimated at any line pressure, as chart is usually limited to a certain line pressure (760 Torr / 0 barG as shown in Linde’s Chart).

With the same understanding of how the dew point temperature can be converted to ppmv, we can utilize the same formula to convert ppmv back to dew point temperature, as demonstrated below. This conversion is particularly useful when employing the tube sampling method for dew point checks, as tube sampling typically provides readings in ppmv, and having the equivalent reading in dew point temperature is very useful.

Flow Restriction Caused by Plug-Type Check Valve

I have experience in a batch processing unit project where saturated LP steam (2 barG, 133 degC) couldn’t lift the piston inside a 1-inch plug-type check valve, causing the steam to be completely blocked.

Recently in another project we had pumps (both main and standby) that delivered flow way below the pump curve. However, similar pumps (same brand, similar sizes) installed in other locations were operating normally.

During commissioning or startup, when encountering flow or pressure issues, the most practical course of action is to perform a pressure survey. A pressure survey, usually carried out by installing temporary pressure gauges in a few selected locations, is the easiest method. It can be performed without needing to shut down the line and is still highly effective in identifying issues in the pipeline.

After performing pressure survey to these troubled pumps, we could narrow down the location of the pressure drop which was between discharge check valve and control valve. Comparing other normally operating pumps with these 2 pumps, we saw the difference in discharge line arrangement, particularly in the check valve selection. The discharge check valve in troubled pump was of a plug type check valve while swing type check valves were used for the others.  Since we already had an experience before with this type of check valve, we were confident that the flow was restricted by the piston in the check valve.

It’s not easy to convince the Plant Owner on our suspicion. They claimed after so many years operating the plant they never had any check valves restricting the flow. Our proposal to remove the spring and plug inside the check valve was rejected after risk assessment because by doing so, the standby pump will lose its reverse flow protection. The best option available to us was to change the check valve spring to a less rigid type. Unfortunately, after conducting a pump test run with a softer spring, no significant improvement was observed. Owner became more confident that the flow issues had nothing to do with check valve selection. We also unchoked the line with spring wire to eliminate any debris inside the line, but to no avail.

To convince Owner that the root cause was still the check valve, we searched for the same check valve in the warehouse & tore down every part of the check valve. Full lift-off check valve plug, with spring compressed to its minimum length only allows small flow of liquid to pass through as shown in Figure 1. Client was convinced this time and allowed us to remove the plug and spring for a test run. The flow improved and root cause confirmed. 

Figure 1 – Plug Type Check Valve in Fully Compressed Spring Still Restricting the Flow

As shown in figure 1, plug type check valve does restricting the flow even when the plug is “fully lifted-off” by the upstream pressure. If this type of check valve is selected, Process & Piping team should confirm the pressure drop with vendor to evaluate if it will be restricting the flow.

Hunchback / Drooping Curved Pumps Switching Issues

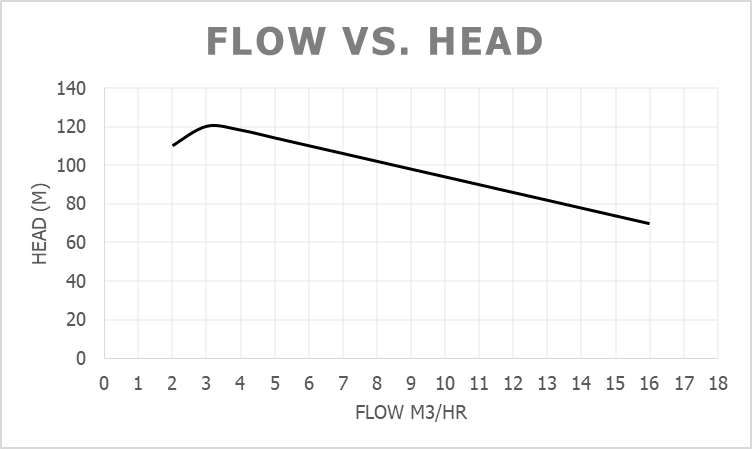
When developing a Mechanical Run Test procedure, pump curves are usually attached as a part of the procedure. When plotting the head against flow, a typical centrifugal pump curve usually indicates a smooth decreasing trend (fig. 1).

Figure. 1 – Typical Pump Curve

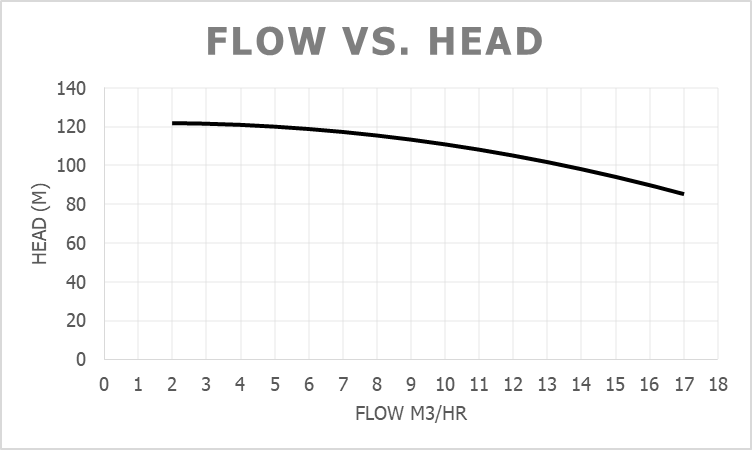
However, there are instances where the pump curve provided by the manufacturer exhibits a rising, peaking, and falling trend (fig.2). This kind of pump characteristic, which we usually refer to as ‘drooping’ or ‘hunchback’, can cause few problems during pump switching operations if not carefully addressed.

Figure. 2 – Hunchback or Drooping Curve (8270-P-101B)

For example, let’s consider a main pump, 8270-P-101-A, running at a normal flow rate of 5 m3/hr (with a head of 114 m). If, for any reason, a switch is required to the standby pump, 8270-P-101-B, the following procedure is usually followed. Once the standby pump is primed, the operator starts the pump while keeping the main pump running. Then, the operator slowly opens the discharge valve of the standby pump to bring it online. After confirming stable standby pump pressure and detecting no abnormal sounds, the operator proceeds to shut off the standby pump.

However, since the pump 8270-P-101-B exhibits a hunchback curve (as shown in fig. 2), during the gradual opening of the discharge valve, the discharge head will increase instead of decreasing until it matches the discharge head of the still-running main pump, 8270-P-101-A. This results in the discharge head of 114 m corresponding to two flow rates: 5 m3/hr for the main pump (8270-P-101-A) and 2.4 m3/hr for the standby pump (8270-P-101-B). In this situation, the standby pump may become stuck running at the low flow rate of around 2.4 m3/hr, leading to cavitation and pressure fluctuations. Without special intervention, such as manipulation of the main pump’s discharge valve or adjusting the flow control valve, the standby pump cannot be stabilized.

In most cases, vendors are aware and have considered this scenario during manufacturing. The normal operating flow rate of the main pump would typically be well outside the inverted U-curve. This can help avoid situations where two flow rates correspond to a single pump head value. If this is not the situation, it becomes necessary to have a discussion with both the vendor and the client. This discussion aims to establish a procedure for stabilizing the standby pump using a special operational control method. This method could involve manipulating the discharge valve of the main pump or adjusting the opening of the flow control valve during the switching operation.